一、GitLab简介
Gitlab是一个开源分布式的版本控制系统。 Ruby语言开发完成。
Gitlab主要实现的功能:
1、管理项目源代码。
2、对源代码进行版本控制。
Gitlab的优势:
1、开源免费,搭建简单、维护成本较低、适合中小型公司。
2、权限管理,能实现代码对部分人可见,确保项目的安全性。
3、离线同步,保证我们不在实时依赖网络环境进行代码提交。
Gitlab版本:GitLab 分为社区版(CE)和企业版(EE)。
配置:建议CPU2核,内存2G以上。
二、GitLab服务构成
Nginx:静态web服务器。
gitlab-shell:用于处理Git命令和修改authorized keys列表。(Ruby)
gitlab-workhorse: 轻量级的反向代理服务器。(go)
GitLab Workhorse是一个敏捷的反向代理。它会处理一些大的HTTP请求,比如文件上传、文件下载、Git push/pull和Git包下载。其它请求会反向代理到GitLab Rails应用,即反向代理给后端的unicorn。
logrotate:日志文件管理工具。
postgresql:数据库。
redis:缓存数据库。
sidekiq:用于在后台执行队列任务(异步执行)。(Ruby)
unicorn:An HTTP server for Rack applications,GitLab Rails应用是托管在这个服务器上面的。(Ruby Web Server,主要使用Ruby编写)
三、GitLab安装
系统环境:
操作系统:CentOS 7.9
服务器IP:192.168.11.199
1、采用Yum方式安装
1)配置Yum源
[root@localhost ~]# vim /etc/yum.repos.d/gitlab-ce.repo
[gitlab-ce]
name=Gitlab CE Repository
baseurl=https://mirrors.tuna.tsinghua.edu.cn/gitlab-ce/yum/el$releasever/
gpgcheck=0
enabled=1
2)更新本地yum缓存
[root@localhost ~]# yum makecache
3)安装Gitlab社区版
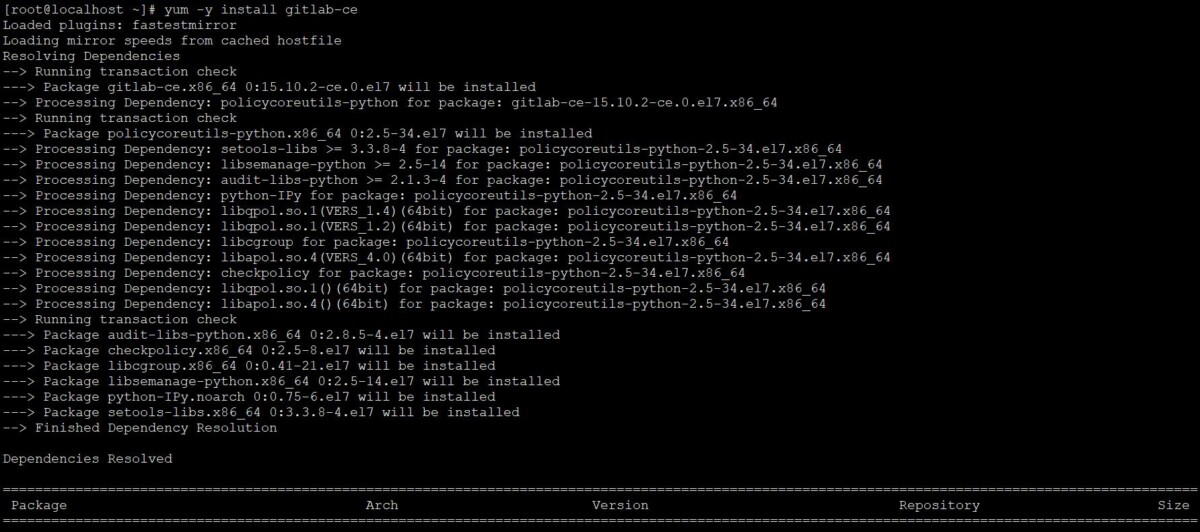
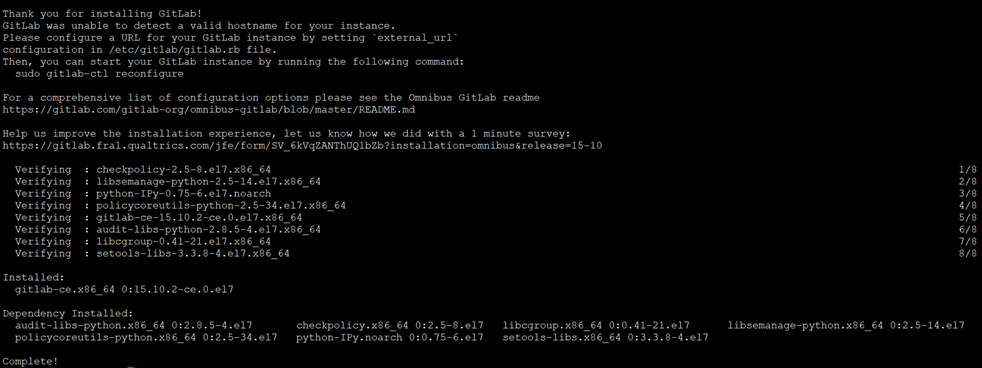
[root@localhost ~]# yum -y install gitlab-ce
4)配置Gitlab
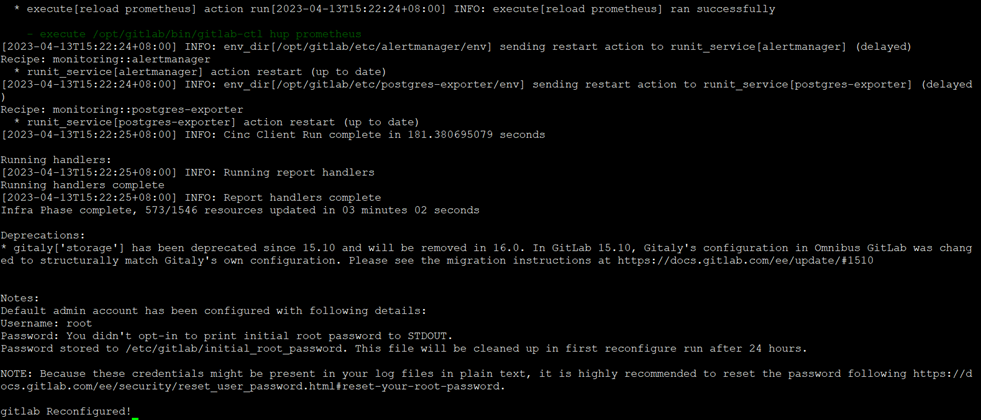
[root@localhost ~]# gitlab-ctl reconfigure
5)启动Gltlab
[root@localhost ~]# gitlab-ctl start
ok: run: alertmanager: (pid 2915) 84s
ok: run: gitaly: (pid 2862) 93s
ok: run: gitlab-exporter: (pid 2894) 86s
ok: run: gitlab-kas: (pid 2872) 88s
ok: run: gitlab-workhorse: (pid 2881) 88s
ok: run: logrotate: (pid 2196) 250s
ok: run: nginx: (pid 2596) 156s
ok: run: node-exporter: (pid 2889) 87s
ok: run: postgres-exporter: (pid 2923) 84s
ok: run: postgresql: (pid 2308) 231s
ok: run: prometheus: (pid 2902) 85s
ok: run: puma: (pid 2506) 174s
ok: run: redis: (pid 2227) 244s
ok: run: redis-exporter: (pid 2896) 86s
ok: run: sidekiq: (pid 2523) 168s
6)访问Gitlab
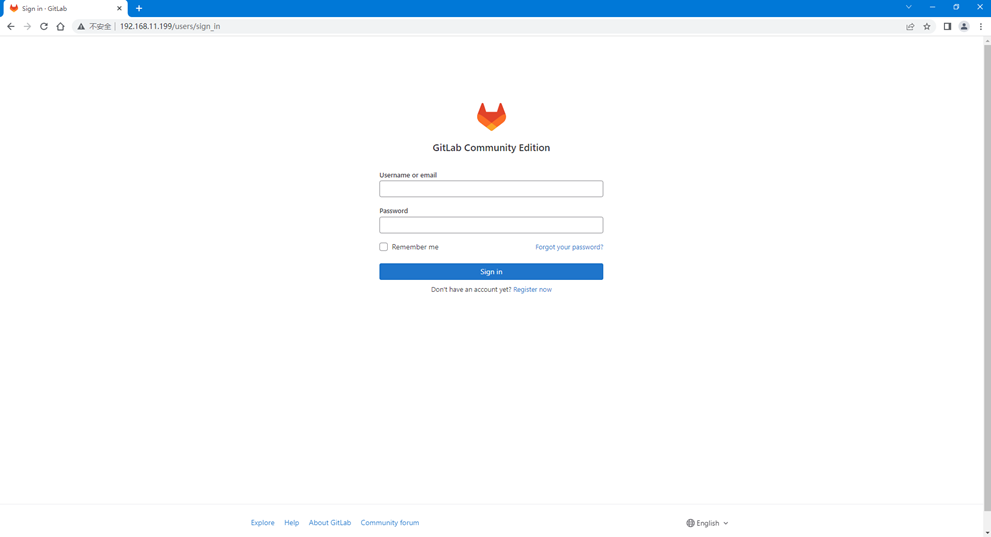
# 浏览器访问http://192.168.11.199,如下图所示
注:初始密码默认保存/etc/gitlab/initial_root_password,默认保留24小时。
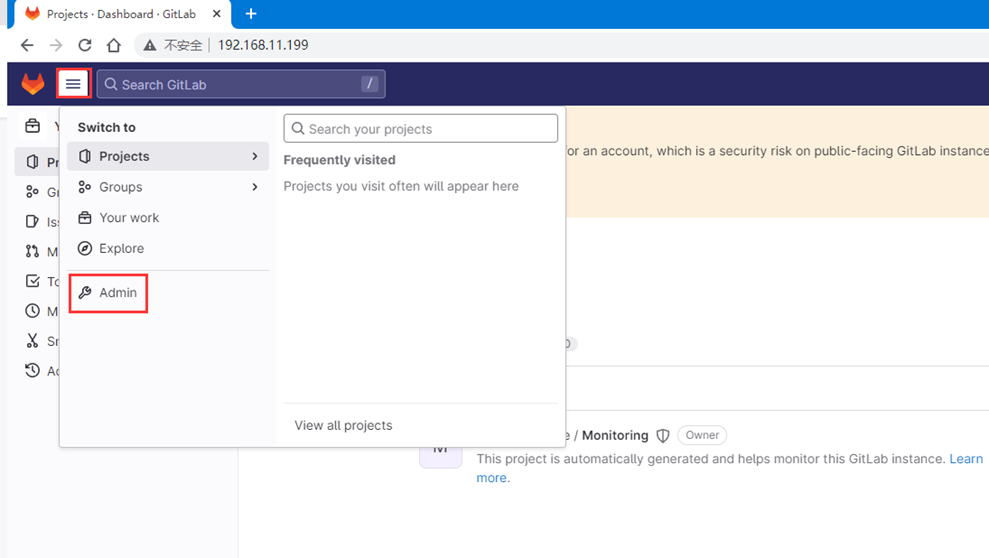
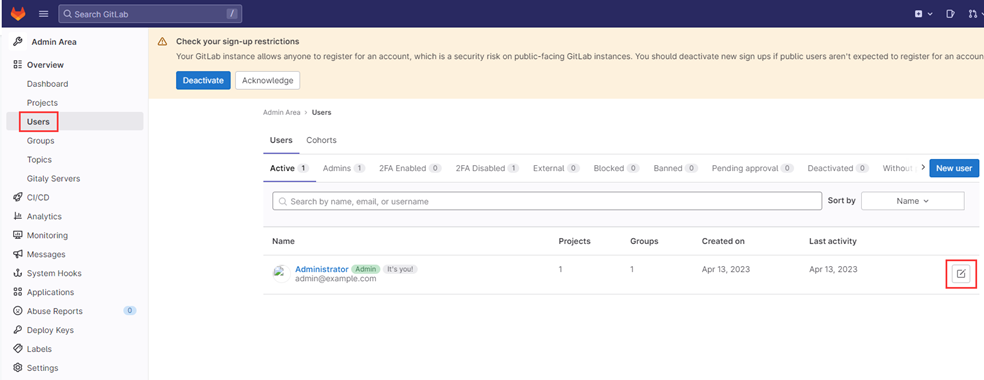
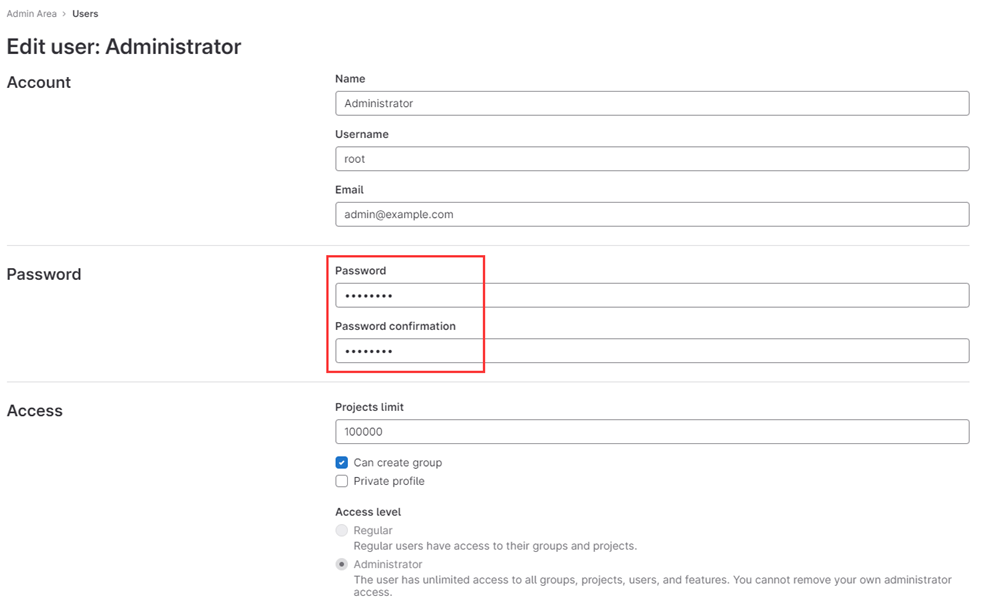
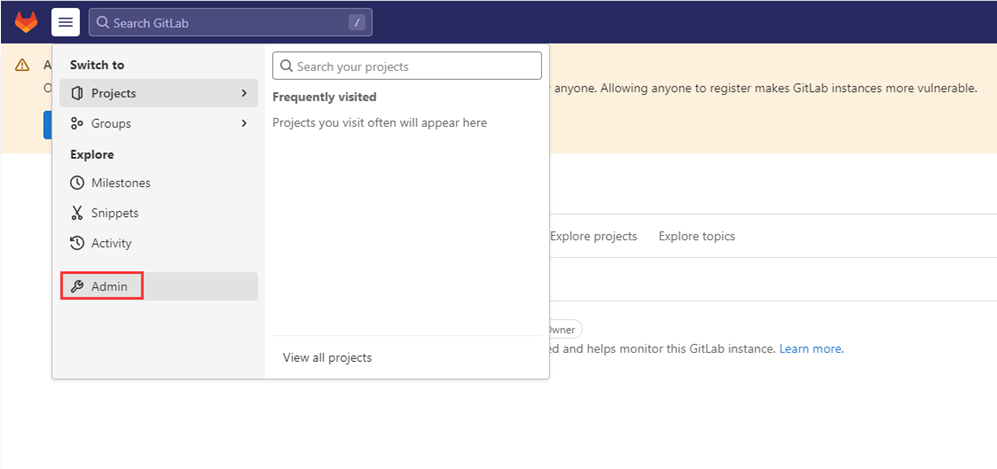
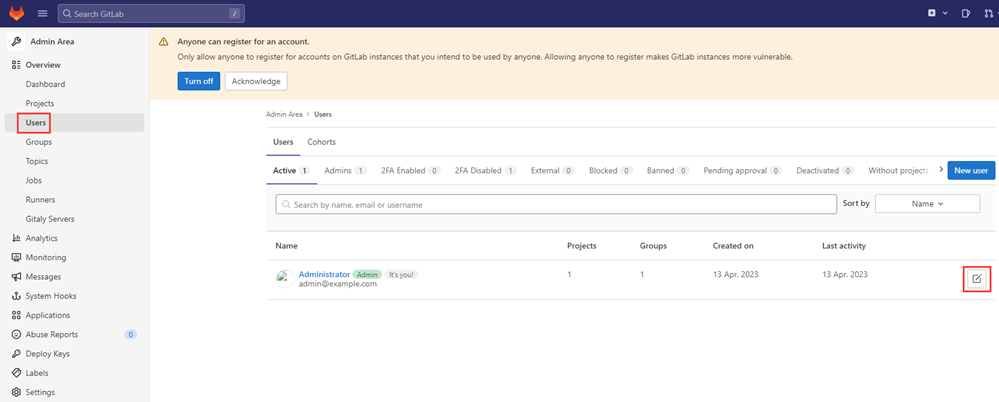
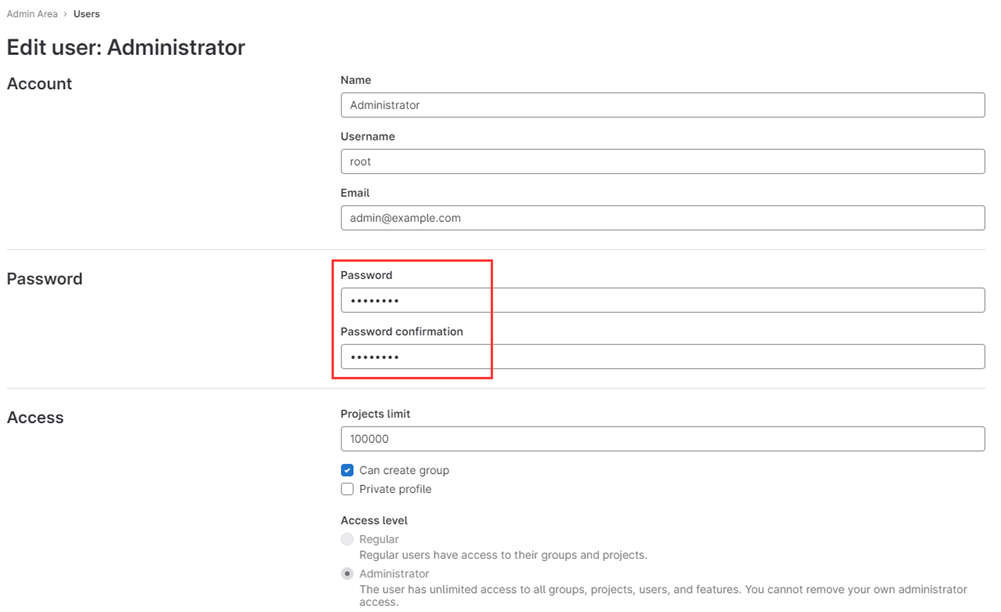
7)修改管理密码
1、输入新密码,点击Save changes保存即可。
注:修改密码后会自动退出到登录界面。
8)登录Gitlab
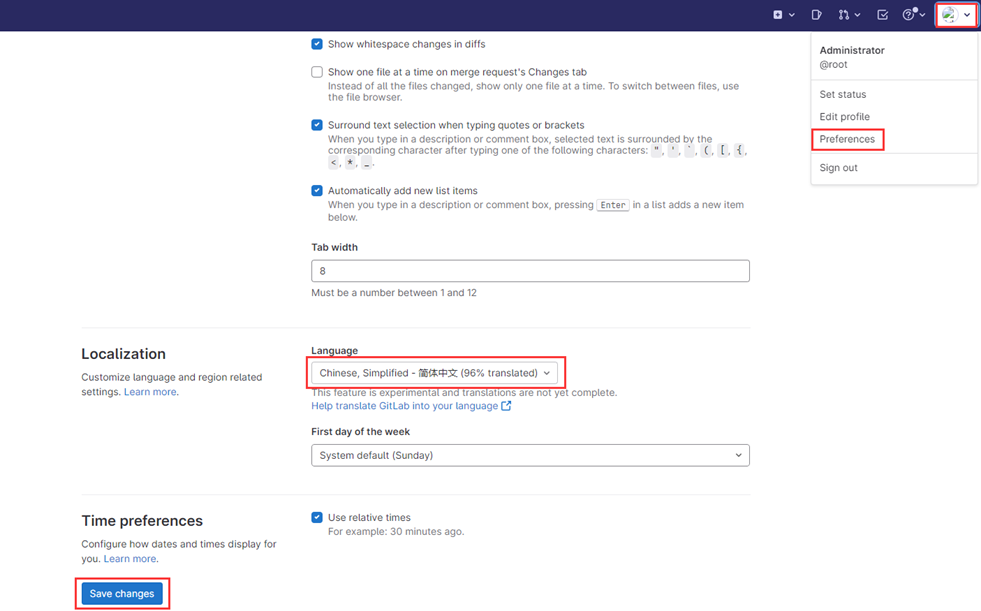
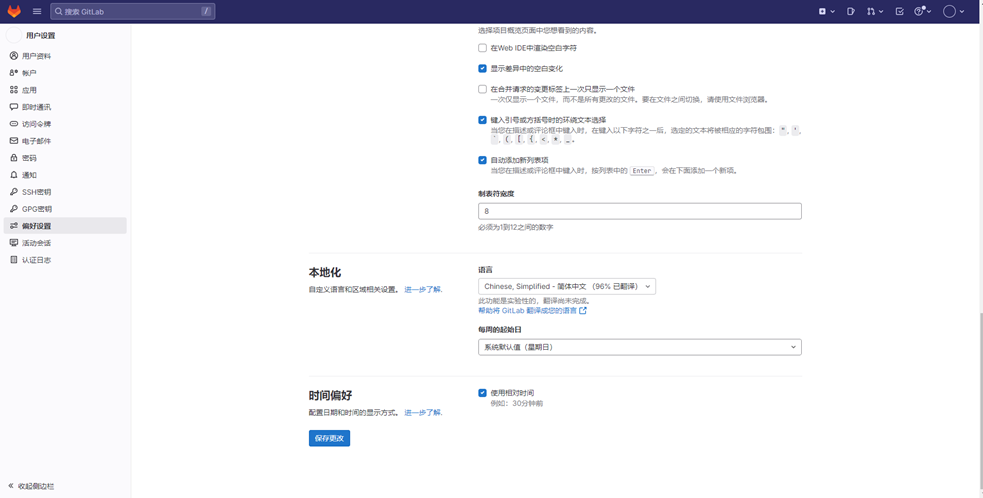
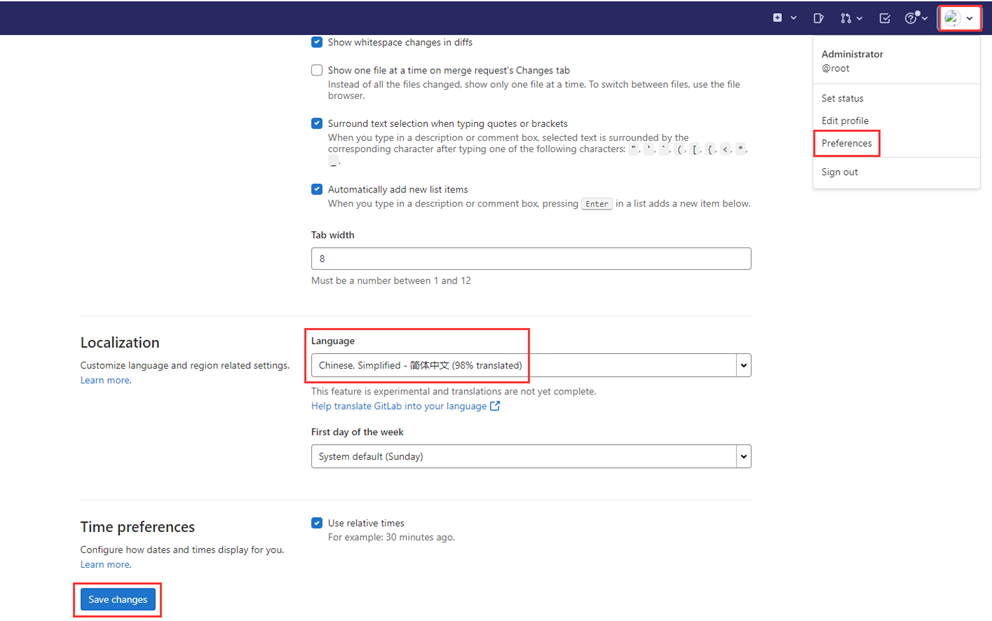
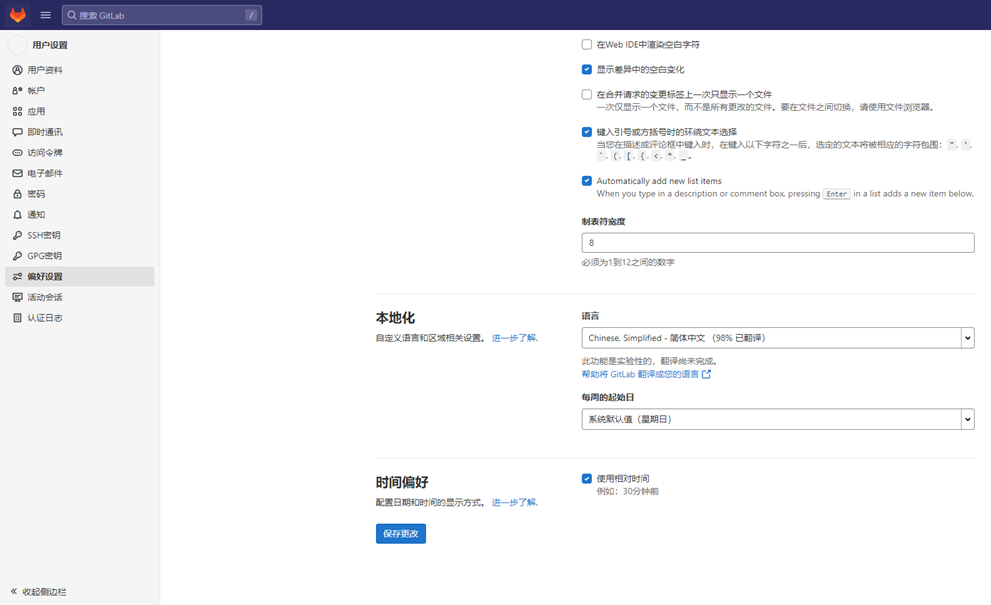
9)修改界面语言为中文
10)按F5刷新即可显示中文界面
11)默认安装完成后常用目录路径
gitlab组件日志路径:/var/log/gitlab
gitlab配置路径:/etc/gitlab/
应用代码和组件依赖程序:/opt/gitlab
各个组件存储路径:/var/opt/gitlab/
仓库默认存储路径:/var/opt/gitlab/git-data/repositories
版本文件备份路径:/var/opt/gitlab/backups/
nginx安装路径:/var/opt/gitlab/nginx/
redis安装路径:/var/opt/gitlab/redis
12)更改默认端口
[root@localhost ~]# sed -i "/^external_url/s#http://.*#http://192.168.11.199'#" /etc/gitlab/gitlab.rb
13)关闭额外不用组件
注:由于Gitlab核心功能是代码托管,所以有些额外的组件比较浪费资源,所以可以考虑关闭。
[root@localhost ~]# cp /etc/gitlab/gitlab.rb /etc/gitlab/gitlab.rb_bak
[root@localhost ~]# vim /etc/gitlab/gitlab.rb
external_url 'http://192.168.11.199'
prometheus['enable'] = false
prometheus['monitor_kubernetes'] = false
alertmanager['enable'] = false
node_exporter['enable'] = false
redis_exporter['enable'] = false
postgres_exporter['enable'] = false
gitlab_exporter['probe_sidekiq'] = false
prometheus_monitoring['enable'] = false
grafana['enable'] = false
14)重启Gitlab
[root@localhost ~]# gitlab-ctl reconfigure
[root@localhost ~]# gitlab-ctl restart
ok: run: gitaly: (pid 6198) 1s
ok: run: gitlab-kas: (pid 6215) 0s
ok: run: gitlab-workhorse: (pid 6224) 0s
ok: run: logrotate: (pid 6236) 1s
ok: run: nginx: (pid 6242) 0s
ok: run: postgresql: (pid 6250) 0s
ok: run: puma: (pid 6263) 0s
ok: run: redis: (pid 6268) 0s
ok: run: sidekiq: (pid 6276) 1s
15)常用命令
gitlab-ctl start # 启动全部服务
gitlab-ctl restart # 重启全部服务
gitlab-ctl stop # 停止全部服务
gitlab-ctl restart nginx # 重启单个服务,如重启nginx
gitlab-ctl status # 查看服务状态
gitlab-ctl reconfigure # 使配置文件生效
gitlab-ctl show-config # 验证配置文件
gitlab-ctl uninstall # 删除gitlab(保留数据)
gitlab-ctl cleanse # 删除所有数据,从新开始
gitlab-ctl tail <service name> # 查看服务的日志
gitlab-ctl tail nginx # 如查看gitlab下nginx日志
gitlab-rails console # 进入控制台
gitlab-ctl help # 查看gitlab帮助信息
gitlab-rake gitlab:backup:create # 备份数据
gitlab-rake gitlab:backup:restore BACKUP=1681374525_2023_04_13_15.10.2 # 恢复指定编号1681374525_2023_04_13_15.10.2数据
2、采用RPM方式安装
1)下载RPM包,这里用的是15.5.5版本
[root@localhost ~]# wget -c --no-check-certificate https://mirrors.tuna.tsinghua.edu.cn/gitlab-ce/yum/el7/gitlab-ce-15.5.5-ce.0.el7.x86_64.rpm
2)安装依赖
[root@localhost ~]# yum -y install curl curl-devel openssh-server openssh-clients postfix cronie policycoreutils-python
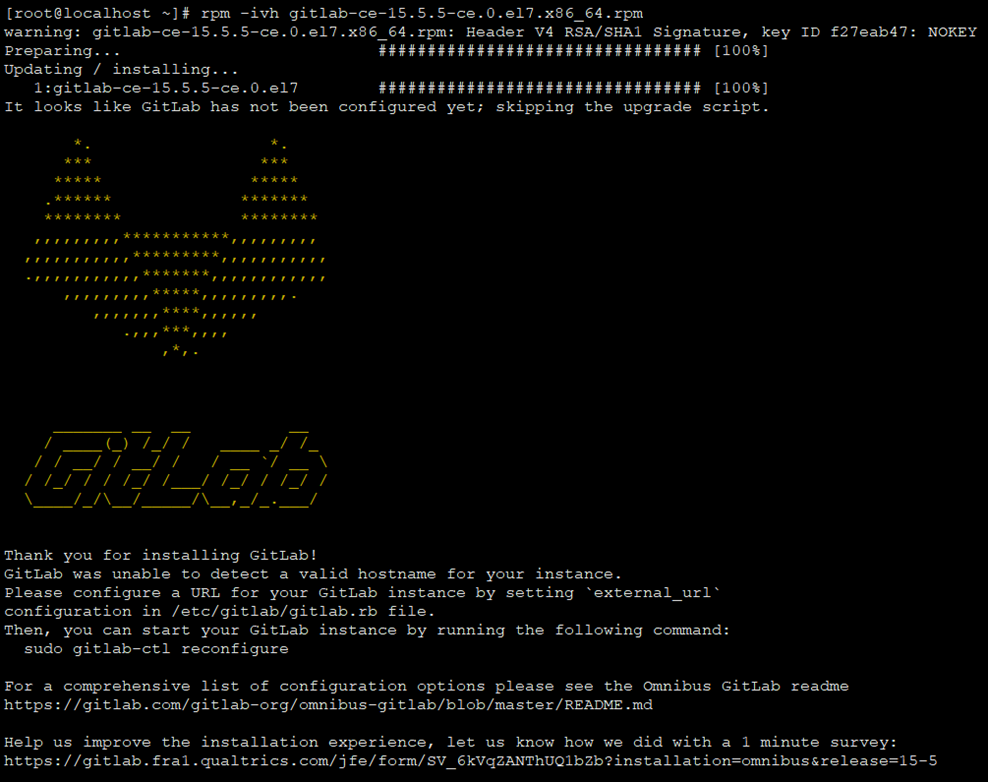
3)安装Gitlab社区版
[root@localhost ~]# rpm -ivh gitlab-ce-15.5.5-ce.0.el7.x86_64.rpm
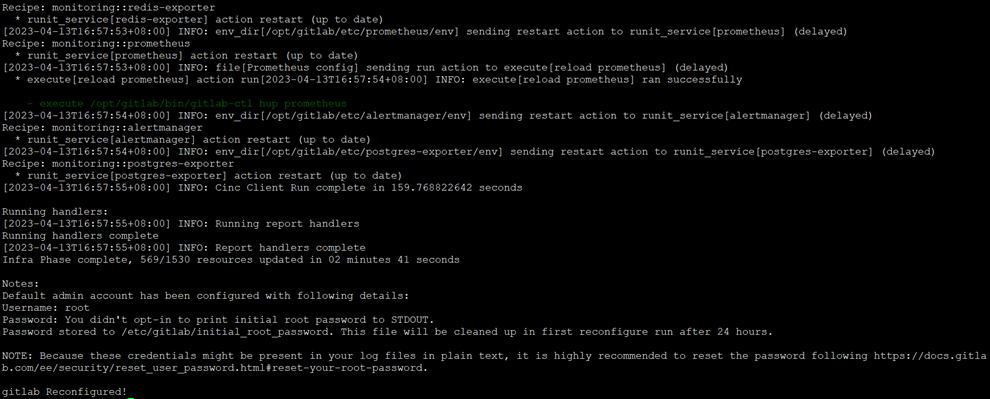
4)配置Gitlab
[root@localhost ~]# gitlab-ctl reconfigure
5)启动Gltlab
[root@localhost ~]# gitlab-ctl start
ok: run: alertmanager: (pid 3058) 96s
ok: run: gitaly: (pid 3077) 95s
ok: run: gitlab-exporter: (pid 3037) 98s
ok: run: gitlab-kas: (pid 3015) 100s
ok: run: gitlab-workhorse: (pid 3024) 99s
ok: run: logrotate: (pid 2254) 242s
ok: run: nginx: (pid 2727) 156s
ok: run: node-exporter: (pid 3032) 99s
ok: run: postgres-exporter: (pid 3068) 96s
ok: run: postgresql: (pid 2445) 224s
ok: run: prometheus: (pid 3045) 97s
ok: run: puma: (pid 2645) 174s
ok: run: redis: (pid 2285) 236s
ok: run: redis-exporter: (pid 3039) 98s
ok: run: sidekiq: (pid 2663) 168s
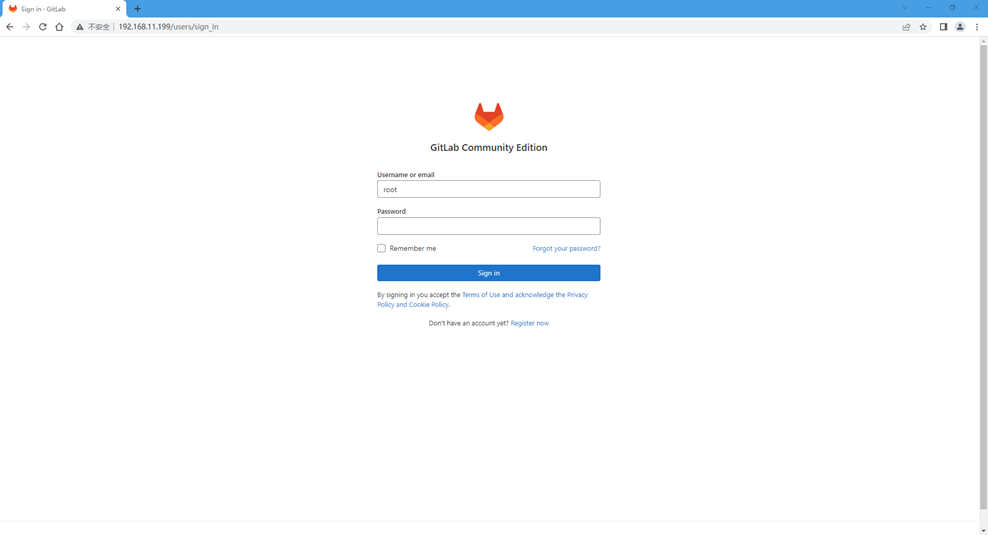
6)访问Gitlab
# 浏览器访问http://192.168.11.199,如下图所示
注:初始密码默认保存/etc/gitlab/initial_root_password,默认保留24小时。
7)修改管理密码
1、输入新密码,点击Save changes保存即可。
注:修改密码后会自动退出到登录界面。
8)登录Gitlab
9)修改界面语言为中文
10)按F5刷新即可显示中文界面
11)默认安装完成后常用目录路径
gitlab组件日志路径:/var/log/gitlab
gitlab配置路径:/etc/gitlab/
应用代码和组件依赖程序:/opt/gitlab
各个组件存储路径:/var/opt/gitlab/
仓库默认存储路径:/var/opt/gitlab/git-data/repositories
版本文件备份路径:/var/opt/gitlab/backups/
nginx安装路径:/var/opt/gitlab/nginx/
redis安装路径:/var/opt/gitlab/redis
12)更改默认端口
[root@localhost ~]# sed -i "/^external_url/s#http://.*#http://192.168.11.199'#" /etc/gitlab/gitlab.rb
13)关闭额外不用组件
注:由于Gitlab核心功能是代码托管,所以有些额外的组件比较浪费资源,所以可以考虑关闭。
[root@localhost ~]# cp /etc/gitlab/gitlab.rb /etc/gitlab/gitlab.rb_bak
[root@localhost ~]# vim /etc/gitlab/gitlab.rb
external_url 'http://192.168.11.199'
prometheus['enable'] = false
prometheus['monitor_kubernetes'] = false
alertmanager['enable'] = false
node_exporter['enable'] = false
redis_exporter['enable'] = false
postgres_exporter['enable'] = false
gitlab_exporter['probe_sidekiq'] = false
prometheus_monitoring['enable'] = false
grafana['enable'] = false
14)重启Gitlab
[root@localhost ~]# gitlab-ctl reconfigure
[root@localhost ~]# gitlab-ctl restart
ok: run: gitaly: (pid 4026) 0s
ok: run: gitlab-kas: (pid 4057) 0s
ok: run: gitlab-workhorse: (pid 4073) 1s
ok: run: logrotate: (pid 4085) 0s
ok: run: nginx: (pid 4092) 1s
ok: run: postgresql: (pid 4100) 0s
ok: run: puma: (pid 4111) 0s
ok: run: redis: (pid 4116) 0s
ok: run: sidekiq: (pid 4127) 0s
15)常用命令
gitlab-ctl start # 启动全部服务
gitlab-ctl restart # 重启全部服务
gitlab-ctl stop # 停止全部服务
gitlab-ctl restart nginx # 重启单个服务,如重启nginx
gitlab-ctl status # 查看服务状态
gitlab-ctl reconfigure # 使配置文件生效
gitlab-ctl show-config # 验证配置文件
gitlab-ctl uninstall # 删除gitlab(保留数据)
gitlab-ctl cleanse # 删除所有数据,从新开始
gitlab-ctl tail <service name> # 查看服务的日志
gitlab-ctl tail nginx # 如查看gitlab下nginx日志
gitlab-rails console # 进入控制台
gitlab-ctl help # 查看gitlab帮助信息
gitlab-rake gitlab:backup:create # 备份数据
gitlab-rake gitlab:backup:restore BACKUP=1681377161_2023_04_13_15.5.5 # 恢复指定编号1681377161_2023_04_13_15.5.5数据
若文章图片、下载链接等信息出错,请在评论区留言反馈,博主将第一时间更新!如本文“对您有用”,欢迎随意打赏,谢谢!






评论